Documentation

Getting started

Installation

The solution is composed of 3 startup projects:

  • Api - NET 9 Web Api project
  • Dashboard - SvelteKit (Svelte 5) project for Dashboard (static page)
  • LandingPage - Svelte Kit (Svelte 5) project with full routing and server rendered pages.

Let's get you setup with .NET and Node first.

Download and install .NET 9 SDK for your favorite operating system (Mac, Linux or Windows)

Open your Terminal or Command Prompt and confirm the installation:

dotnet --version
9.0.102

Download and install Node.js also for your favorite operating system (Mac, Linux or Windows) and confirm the installation:

node --version
v22.13.0

Getting started

Launching

Navigate to the project Api directory:

cd src/Fanks.Api
dotnet run

Now you can navigate to:

You will also notice the API will create SQLite database in root of the project Api/database.db
(to view SQLite you can use https://sqlitebrowser.org )

👏 👏 👏 Congrats you have your API running! 👏 👏 👏

Navigate to Dashboard project directory:

cd src/Fanks.Dashboard
yarn install
yarn dev

Once running navigate to:

http://localhost:3001

👏 👏 👏 Congrats you have your frontend running! 👏 👏 👏

Navigate to Landing Page project directory:

cd src/Fanks.LandingPage
yarn install
yarn dev

Once running navigate to:

http://localhost:3000

👏 👏 👏 Congrats you have your landing page running! 👏 👏 👏

Configuration

Super Admin Role

Before we begin, we need to setup a super admin user. The super admin user is the user that has access to all parts of the application. The page below will simply ask for an email and create a user and assign it SuperAdmin role.

Please navigate to http://localhost:3001/install and follow the instructions.

After the installation remove:

Fanks.Dashboard/src/routes/(public)/install
Handlers/Handlers/Users/Commands/Install.cs

👏 👏 👏 Congrats you have full control! 👏 👏 👏

Configuration

Application Name & API Host

First thing or at some point you want to name your project and tell the your application where your API is. Jump into this file:

Fanks.Dashboard/.env

PUBLIC_APPNAME = "Fanks Dashboard"
PUBLIC_API_BASE_URL="http://localhost:5000"

Why do we need this?

Well if you are running it on your local machine you might want to keep pointing API at localhost but when you are live or test site you need to point to a real API. Same for the name. If you have like test enviroment you might want to set it as:
PUBLIC_APPNAME = "Fanks Test" .

For Landing Page:

Fanks.LandingPage/.env

PUBLIC_APPNAME = "Fanks Landing"

Deployment

Overview

There are 3 deployable projects:

  • Api - requires dotnet runtime
  • Dashboard - requires any web server (to serve static files)
  • Landing Page - requires node.js

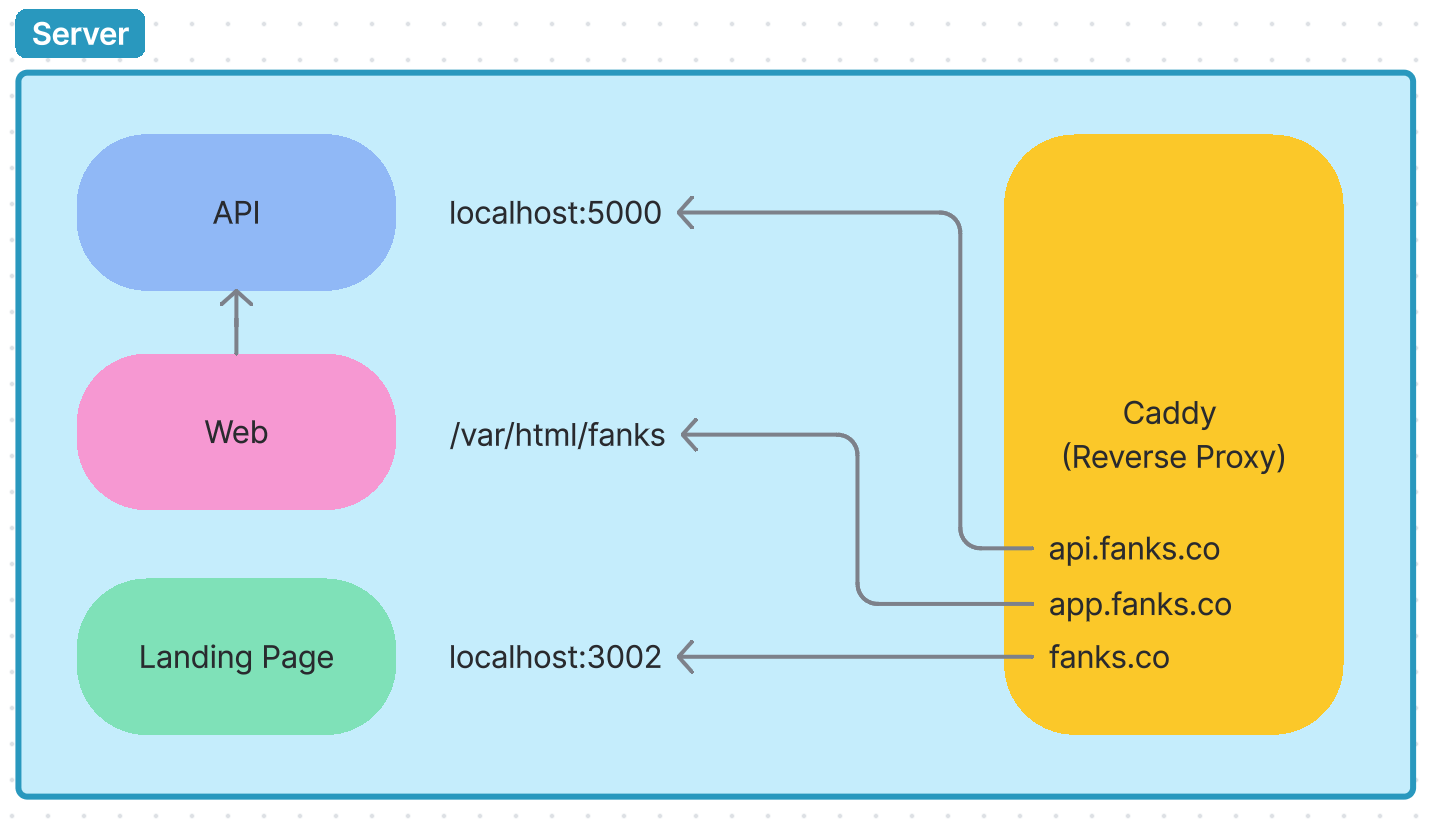
There are many ways you can deploy it. Here is a quick overview of deployment of all 3 on a single server in a manual way.
For simplicity we will use Caddy as a proxy server deployed on the latest Ubuntu

Deployment Overview

Deployment

Api Deployment

First we need to create a Release build of your API. Run these commands on your machine:

cd src/Fanks.Api
dotnet publish --configuration Release --runtime linux-x64 --self-contained true --output ./publish -p:DebugSymbols=false

Now you can upload the content of publish to your server, using ftp or tools like scp.

scp -r ./publish user@your-ubuntu-ip:/var/apps/fanks-api

Make it executable

chmod +x /var/apps/fanks-api/Fanks.Api

Set the permissions on the directory:

Run it:

cd /var/apps/fanks-api/
./Fanks.Api

You should see the output:

[17:05:27 INF] Now listening on: http://localhost:5000
[17:05:27 INF] Application started. Press Ctrl+C to shut down.
[17:05:27 INF] Hosting environment: Production
[17:05:27 INF] Content root path: /var/apps/fanks-api

In the next section we will see how to get it up and running

Deployment

Sqlite Database Deployment

If you are not using SQLite, you can skip this section.

Let's create a directory to store the database separated from the app.

sudo mkdir /var/apps/fanks-db

... now upload your database.db file to the location above

Next, apply permission so the API can read / write to the database

sudo chown -R www-data:www-data /var/apps/fanks-db/
sudo chmod 664 /var/apps/fanks-db/database.db*
sudo chmod 775 /var/apps/fanks-db/

Deployment

Api as Service

You need your API to run as a service to survive the reboot.

sudo nano /etc/systemd/system/fanks-api.service
[Unit]
Description=Fanks Api

[Service]
WorkingDirectory=/var/apps/fanks-api
ExecStart=/var/apps/fanks-api/Fanks.Api
Restart=always
RestartSec=10
KillSignal=SIGINT
User=www-data
Environment=ASPNETCORE_ENVIRONMENT=Production
Environment=DOTNET_PRINT_TELEMETRY_MESSAGE=false

StandardOutput=append:/var/log/fanks-api.log
StandardError=/var/log/fanks-api.log

[Install]
WantedBy=multi-user.target

The log file we specified above need to be created manually:

sudo touch /var/log/fanks-api.log

We also need to give www-data user permission to write to it:

sudo chown www-data:www-data /var/log/fanks-api.log

Let's spin the service:

sudo systemctl enable fanks-api.service
sudo systemctl start fanks-api
sudo systemctl status fanks-api

You should see this:

● fanks-api.service - Fanks Api
	Loaded: loaded (/etc/systemd/system/fanks-api.service; enabled; preset: enabled)
	Active: active (running) since Fri 2025-06-06 17:19:33 UTC; 3s ago
	Main PID: 18113 (Fanks.Api)
	Tasks: 15 (limit: 995)
	Memory: 40.1M (peak: 40.2M)
	CPU: 1.015s
	CGroup: /system.slice/fanks-api.service
		└─18113 /var/apps/fanks-api/Fanks.Api

Verify:

curl http://localhost:5000
Hello there! I'm Obi-Wan Kenobi, and this is the API you're looking for.

If you need to view logs just hit:

tail /var/log/fanks-api.log
Deployment

Dashboard Deployment

Let's create a build by running these commands on your machine:

cd src/Fanks.Dashboard
yarn install
yarn build

Now you can upload the content of build (which is a static page) to your server.

scp -r ./build user@your-ubuntu-ip:/var/apps/fanks-dashboard

That's all is needed!

We will verify it once we get Caddy running in the section below.

Deployment

Landing Page Deployment

Let's create a build by running these commands on your machine:

cd src/Fanks.LandingPage
yarn install
yarn build

now we need to copy package.json to build directory

cp package.json build/package.json
cp -R node_modules build/node_modules
scp -r ./build user@your-ubuntu-ip:/var/apps/fanks-landing-page

Deployment

Run Landing Page

Install Node.js

sudo apt update
sudo apt install nodejs
sudo apt install npm

Verify installation

node -v
npm -v

Let's test the runtime

cd /var/apps/fanks-landing-page
node index.js

Install pm2 to keep our nodejs app alive

sudo npm install pm2 -g

Now let's run it as service using pm2

pm2 start "node index.js" --name "fanks-landing-page" --interpreter none -- --port 3000
pm2 save

Verify:

curl http://localhost:3000
<!doctype html>
<html lang="en">
	<head>
		<meta charset="utf-8" />
		<link rel="icon" href="./favicon.png" />
		<meta name="viewport" content="width=device-width, initial-scale=1" />
		<link href="./_app/immutable/assets/0.DbJhB-dd.css" rel="stylesheet">
	</head>


...

We are done! 👏

Deployment

Caddy Installation and Configuration

The instructions are taken from here: Caddy Docs

sudo apt install -y debian-keyring debian-archive-keyring apt-transport-https curl
curl -1sLf 'https://dl.cloudsmith.io/public/caddy/stable/gpg.key' | sudo gpg --dearmor -o /usr/share/keyrings/caddy-stable-archive-keyring.gpg
curl -1sLf 'https://dl.cloudsmith.io/public/caddy/stable/debian.deb.txt' | sudo tee /etc/apt/sources.list.d/caddy-stable.list
sudo apt update
sudo apt install caddy

Verify:

systemctl status caddy

Let's add our sites:

sudo nano /etc/caddy/Caddyfile
api.fanks.co {
    reverse_proxy localhost:5000    
}

fanks.co {
    reverse_proxy localhost:3000
}

dashboard.fanks.co {
  root * /var/apps/fanks-dashboard
  try_files {path} /index.html
  file_server
}
sudo systemctl start caddy

Troubleshooting

yarn: Command failed with exit code 127

Affecting:

  • - Dashboard
  • - Landing Page

If you see something like Command failed with exit code 127 or unable to run Dashboard or Landing Page try the following:

rm -rf node_modules 
rm yarn.lock
yarn cache clean
yarn install

Troubleshooting

SQLite Error 8: 'attempt to write a readonly database'.

Affecting:

  • - Api

sudo chmod ug+w /var/apps/fanks-api/database.db

Troubleshooting

MimeKit.ParseException: Invalid addr-spec token at offset 0

Affecting:

  • - Api

This is because you are using sender as "Your App <noreply@yourapp.com>"